Google Search

How To Create Background Service In Android

=> Here I explain Android Service using One Simple Example Of When Service Is Start at that time Default ringtone is Start.

   What Is Service?

                              Service is a Long time Background process.in this service used many way like play music,phone call receive etc.


Once Service is start then Application is remove in recent app list.so this app can not close because of service is start in Background .

    In this Tutorial create one xml file in this file create are two buttons Service Start And Service Stop.


 When Service Start is press then check if you running already a service then open alert dialog box to choose service is running you want to stop a service.


Service Layout 


Background Android Service


start service


already service starting

service stop

Layout xml File

<?xml version="1.0" encoding="utf-8"?>
<RelativeLayout xmlns:android="http://schemas.android.com/apk/res/android"
    android:layout_width="match_parent"
    android:layout_height="match_parent"
    xmlns:ads="http://schemas.android.com/tools"
    android:background="#5cdf88">

    <TextView
        android:textStyle="bold"
        android:textColor="#434844"
        android:layout_marginTop="60dp"
        android:layout_centerHorizontal="true"
        android:text="Welcome To Service Example"
        android:textAppearance="?android:attr/textAppearanceLarge"
        android:layout_width="wrap_content"
        android:layout_height="wrap_content" />
    <LinearLayout
        android:layout_width="match_parent"
        android:layout_height="wrap_content"
        android:layout_centerHorizontal="true"
        android:layout_centerVertical="true"
        android:layout_marginLeft="20dp"
        android:layout_marginRight="20dp"
        android:background="#a1cc98"
        android:orientation="vertical">

        <Button
            android:id="@+id/btn_start"
            android:layout_width="match_parent"
            android:layout_height="wrap_content"
            android:layout_gravity="center"
            android:layout_margin="40dp"
            android:background="@drawable/bt_bg"
            android:text="Service Start"
            android:textAllCaps="false"
            android:textAppearance="?android:attr/textAppearanceMedium"
            android:textColor="@android:color/white" />

        <Button
            android:id="@+id/btn_stop"
            android:layout_width="match_parent"
            android:layout_height="wrap_content"
            android:layout_gravity="center"
            android:layout_margin="40dp"
            android:background="@drawable/bt_bg"
            android:text=" Service  Stop"
            android:textAllCaps="false"
            android:textAppearance="?android:attr/textAppearanceMedium"
            android:textColor="@android:color/white" />
    </LinearLayout>
    <com.google.android.gms.ads.AdView
        xmlns:ads="http://schemas.android.com/apk/res-auto"
        android:id="@+id/adView"
        android:layout_alignParentBottom="true"
        android:layout_width="match_parent"
        android:layout_height="wrap_content"
        ads:adSize="BANNER"
        ads:adUnitId="@string/banner_home_footer">
    </com.google.android.gms.ads.AdView>
</RelativeLayout>

Main Activity Javafile


package com.college.servicedemo;
import android.app.ActivityManager;
import android.app.AlertDialog;
import android.content.Context;
import android.content.DialogInterface;
import android.content.Intent;
import android.support.v7.app.AppCompatActivity;
import android.os.Bundle;
import android.view.View;
import android.widget.Button;
import android.widget.Toast;

import com.crashlytics.android.Crashlytics;
import com.google.android.gms.ads.AdRequest;
import com.google.android.gms.ads.AdView;
import io.fabric.sdk.android.Fabric;

public class MainActivity extends AppCompatActivity {
    Button btn_start, btn_stop;
    private AdView mAdView;


    @Override
    protected void onCreate(Bundle savedInstanceState) {
        super.onCreate(savedInstanceState);
        Fabric.with(this, new Crashlytics());
        setContentView(R.layout.activity_main);

// this Three line Code is addmob Add Code so if you dont want to include add then dont write this code....

        mAdView = (AdView) findViewById(R.id.adView);
        AdRequest adRequest = new AdRequest.Builder()
                .build();
        mAdView.loadAd(adRequest);
//............Admob Ad Code.


        btn_start = (Button) findViewById(R.id.btn_start);
        btn_stop = (Button) findViewById(R.id.btn_stop);
        btn_start.setOnClickListener(new View.OnClickListener() {
            @Override
            public void onClick(View view) {
                if (isMyServiceRunning(MyService.class)) {
                    final AlertDialog.Builder alert = new AlertDialog.Builder(MainActivity.this);
                    alert.setMessage("You Want To Stop Service ?")
                            .setTitle("Service is Running");
                    alert.setPositiveButton("Yes", new DialogInterface.OnClickListener() {
                        @Override
                        public void onClick(DialogInterface dialogInterface, int i) {
                            stopService(new Intent(MainActivity.this, MyService.class));
                        }
                    });
                    alert.setNegativeButton("Cancel", new DialogInterface.OnClickListener() {
                        @Override
                        public void onClick(DialogInterface dialogInterface, int i) {
                            dialogInterface.cancel();
                        }
                    });
                    AlertDialog alert11 = alert.create();
                    alert11.show();
                    Toast.makeText(MainActivity.this, "FirstStop The running serivce", Toast.LENGTH_SHORT).show();
                } else {
                    startService(new Intent(MainActivity.this, MyService.class));
                }
            }
        });
        btn_stop.setOnClickListener(new View.OnClickListener() {
            @Override
            public void onClick(View view) {
                if (isMyServiceRunning(MyService.class)) {
                    final AlertDialog.Builder alert = new AlertDialog.Builder(MainActivity.this);
                    alert.setMessage("You Want To Stop Service ?")
                            .setTitle("Service is Running");
                    alert.setPositiveButton("Yes", new DialogInterface.OnClickListener() {
                        @Override
                        public void onClick(DialogInterface dialogInterface, int i) {
                            stopService(new Intent(MainActivity.this, MyService.class));
                        }
                    });
                    alert.setNegativeButton("Cancel", new DialogInterface.OnClickListener() {
                        @Override
                        public void onClick(DialogInterface dialogInterface, int i) {
                            dialogInterface.cancel();
                        }
                    });
                    AlertDialog alert11 = alert.create();
                    alert11.show();
                   // Toast.makeText(MainActivity.this, "FirstStop The running serivce", Toast.LENGTH_SHORT).show();
                } else {
                   // startService(new Intent(MainActivity.this, MyService.class));
                }
            }
        });
    }

    @Override
    public void onPause() {
        if (mAdView != null) {
            mAdView.pause();
        }
        super.onPause();
    }

    @Override
    public void onResume() {
        super.onResume();
        if (mAdView != null) {
            mAdView.resume();
        }
    }

    @Override
    public void onDestroy() {
        if (mAdView != null) {
            mAdView.destroy();
        }
        super.onDestroy();
    }

    private boolean isMyServiceRunning(Class<?> serviceClass) {
        ActivityManager manager = (ActivityManager) getSystemService(Context.ACTIVITY_SERVICE);
        for (ActivityManager.RunningServiceInfo service : manager.getRunningServices(Integer.MAX_VALUE)) {
            if (serviceClass.getName().equals(service.service.getClassName())) {
                return true;
            }
        }
        return false;
    }
}

My Service.Java file


package com.college.servicedemo;

import android.app.Service;
import android.content.Context;
import android.content.Intent;
import android.media.MediaPlayer;
import android.media.audiofx.BassBoost;
import android.media.audiofx.EnvironmentalReverb;
import android.os.IBinder;
import android.provider.Settings;
import android.support.annotation.IntDef;
import android.support.annotation.Nullable;
import android.util.Log;
import android.widget.Toast;

/**
 * Created by admin on 01-09-2017.
 */

public class MyService extends Service {
    MediaPlayer player;

    @Nullable
    @Override
    public IBinder onBind(Intent intent) {
        return null;
    }

    @Override
    public int onStartCommand(Intent intent, int flags, int startId) {

        player = MediaPlayer.create(this, Settings.System.DEFAULT_RINGTONE_URI);
        player.setLooping(true);
        player.start();
        Log.d("service", "Start");
        Toast.makeText(this, "StartService", Toast.LENGTH_SHORT).show();
        return START_STICKY;
    }

    @Override
    public void onDestroy() {
        super.onDestroy();
        player.stop();
        Log.d("service", "Stop");
        Toast.makeText(this, "StopService", Toast.LENGTH_SHORT).show();
    }
}

Manifest File


<?xml version="1.0" encoding="utf-8"?>
<manifest xmlns:android="http://schemas.android.com/apk/res/android"
    package="com.college.servicedemo">
    <uses-permission android:name="android.permission.INTERNET" />
    <uses-permission android:name="android.permission.ACCESS_NETWORK_STATE" />

    <application
        android:allowBackup="true"
        android:icon="@mipmap/ic_launcher"
        android:label="@string/app_name"
        android:roundIcon="@mipmap/ic_launcher_round"
        android:supportsRtl="true"
        android:theme="@style/AppTheme">
        <activity android:name=".MainActivity">
            <intent-filter>
                <action android:name="android.intent.action.MAIN" />
                <category android:name="android.intent.category.LAUNCHER" />
            </intent-filter>
        </activity>
        <meta-data
            android:name="com.google.android.gms.version"
            android:value="@integer/google_play_services_version" />
        <service android:name=".MyService" />
        <activity
            android:name="com.google.android.gms.ads.AdActivity"
            android:configChanges="keyboard|keyboardHidden|orientation|screenLayout|uiMode|screenSize|smallestScreenSize"
            android:theme="@android:style/Theme.Translucent" />
        <meta-data
            android:name="io.fabric.ApiKey"
            android:value="029834fec845a76f87f892037d98209d2d1dbff3" />
    </application>

</manifest>

btn_bg Drawable File


<?xml version="1.0" encoding="utf-8"?>
<shape xmlns:android="http://schemas.android.com/apk/res/android">
<gradient android:centerColor="#5e684b" android:startColor="#0f4ece" android:endColor="#243b5b"/>
    <corners
        android:radius="5dp"></corners>
</shape>


How To Sort Month Name Using comparator Interface

==>java Provide comparator and Coprator interface. this interface used to sort a data.
Here i used Comparator Interface to Sort A Month Name.

==>This Interface is very useful when ever i want to Compare two String Object .

Main.xmlfile
 <?xml version="1.0" encoding="utf-8"?>
<android.support.constraint.ConstraintLayout xmlns:android
="http://schemas.android.com/apk/res/android"
    xmlns:app="http://schemas.android.com/apk/res-auto"
    xmlns:tools="http://schemas.android.com/tools"
    android:layout_width="match_parent"
    android:layout_height="match_parent"
    tools:context="com.college.sortmonthname.MainActivity">

    <TextView
        android:id="@+id/tv_name"
        android:layout_width="wrap_content"
        android:layout_height="wrap_content"
        android:text="monthname"
        app:layout_constraintBottom_toBottomOf="parent"
        app:layout_constraintLeft_toLeftOf="parent"
        app:layout_constraintRight_toRightOf="parent"
        app:layout_constraintTop_toTopOf="parent" />

</android.support.constraint.ConstraintLayout>


MainActivity.java
package com.college.sortmonthname;

import android.support.v7.app.AppCompatActivity;
import android.os.Bundle;
import android.widget.TextView;
import android.widget.Toast;

import java.text.ParseException;
import java.text.SimpleDateFormat;
import java.util.Arrays;
import java.util.Collections;
import java.util.Comparator;
import java.util.Date;
import java.util.List;

public class MainActivity extends AppCompatActivity {
    TextView name;

    @Override
    protected void onCreate(Bundle savedInstanceState) {
        super.onCreate(savedInstanceState);
        setContentView(R.layout.activity_main);
        name = (TextView) findViewById(R.id.tv_name);
        List<String> month = Arrays.asList("Feb", "Jul", "Jan", "Apr", "Dec",
 "Aug", "Oct", "May", "Sep", "Nov", "Jun", "Mar");
        final Comparator<String> compare = new Comparator<String>() {

            public int compare(String o1, String o2) {

              SimpleDateFormat sdate = new SimpleDateFormat("MMM");
              Date s1 = null;
              Date s2 = null;
              try {
                  s1 = sdate.parse(o1);
                  s2 = sdate.parse(o2);
              } catch (ParseException e) {
                  e.printStackTrace();
              }
              return s1.compareTo(s2);
          }
      };

      Collections.sort(month, compare);
      name.setText(String.valueOf(month));
   }
}

output
Android Sort using Collection


How To Add Fragment at Runtime In Activity

-->Hello Friends Today i post one important topic is Fragment. In this Post you Can easily Learn How To Add Fragment At runtime  in our Activity.

-->Fragment is one of the most important topic  in android.whenever i used Fragment So no need to Handle our Activity OnBackPress.

-->in android used Fragment when multiple View or Activity Can Available our Project.


FirstFragment.xmlfile  


<?xml version="1.0" encoding="utf-8"?> 
<RelativeLayout xmlns:android="http://schemas.android.com/apk/res/android" 
 android:layout_width="match_parent" 
 android:layout_height="match_parent" 
 android:background="#da6f66">

 <TextView  android:gravity="center" 
 android:layout_width="match_parent" 
 android:layout_height="match_parent" 
 android:layout_centerHorizontal="true" 
 android:layout_centerVertical="true" 
 android:text="@string/text1" 
 android:textAllCaps="false" 
 android:textColor="@color/text_btn" 
 android:textSize="20dp" />

</RelativeLayout>

SecondFragment.xmlfile  


<?xml version="1.0" encoding="utf-8"?> 
<RelativeLayout xmlns:android="http://schemas.android.com/apk/res/android" 
 android:layout_width="match_parent" 
 android:layout_height="match_parent" 
 android:background="#371f4d">

    <TextView 
 android:layout_width="match_parent" 
 android:layout_height="match_parent" 
 android:layout_centerHorizontal="true"
 android:layout_centerVertical="true" 
 android:text="@string/text2" 
 android:textAllCaps="false" 
 android:gravity="center" 
 android:textColor="@color/text_btn" 
 android:textSize="20dp" />

</RelativeLayout>

Main.XmlFile 

<?xml version="1.0" encoding="utf-8"?>
 <RelativeLayout xmlns:android="http://schemas.android.com/apk/res/android"
     xmlns:app="http://schemas.android.com/apk/res-auto" 
 xmlns:tools="http://schemas.android.com/tools" 
 android:layout_width="match_parent" 
 android:layout_height="match_parent"
     android:background="#79efb0" 
 tools:context="com.college.runtimeaddfragmentdemo.MainActivity">

    <LinearLayout 
 android:id="@+id/ll_first" 
 android:layout_width="match_parent" 
 android:layout_height="wrap_content" 
 android:weightSum="2">

        <Button 
 android:id="@+id/btn_frag1" 
 android:layout_width="0dp" 
 android:layout_height="wrap_content" 
 android:layout_margin="5dp" 
 android:layout_weight="1" 
 android:background="@color/back_btn" 
 android:text="@string/btn1" 
 android:textAllCaps="false" 
 android:textColor="@color/text_btn" />

        <Button 
 android:id="@+id/btn_frag_two" 
 android:layout_width="0dp" 
 android:layout_height="wrap_content" 
 android:layout_margin="5dp" 
 android:layout_weight="1" 
 android:background="@color/back_btn" 
 android:text="@string/btn2" 
 android:textAllCaps="false" 
 android:textColor="@color/text_btn" />
    </LinearLayout>

    <FrameLayout 
 android:id="@+id/ff_layout" 
 android:layout_width="wrap_content" 
 android:layout_height="200dp" 
 android:layout_below="@+id/ll_first" 
 android:orientation="horizontal">

        <FrameLayout 
 android:id="@+id/ll_container_first" 
 android:layout_width="match_parent" 
 android:layout_height="250dp" 
 android:orientation="horizontal"/>


    </FrameLayout>

    <FrameLayout 
 android:id="@+id/ll_container_second" 
 android:layout_width="match_parent" 
 android:layout_height="200dp" 
 android:layout_below="@id/ff_layout">
 </FrameLayout>
</RelativeLayout>
 
String.xmlfile 


<resources>
    <string name="app_name">RuntimeAddFragmentDemo</string>
    <string name="btn1">Load First fragment</string>
    <string name="btn2">Load Second fragment</string>
    <string name="text1">First Fragment</string>
    <string name="text2">Second Fragment</string>
</resources>


color.xmlfile


<?xml version="1.0" encoding="utf-8"?><resources>
    <color name="colorPrimary">#3F51B5</color>
    <color name="colorPrimaryDark">#303F9F</color>
    <color name="colorAccent">#FF4081</color>
    <color name="text_btn">#FFFFFF</color>
    <color name="back_btn">#c261ec</color>
    <color name="text_textview">#a42395</color>
</resources>

First_Fragment.java

package com.college.runtimeaddfragmentdemo;

import android.app.Fragment;
import android.os.Bundle;
import android.support.annotation.Nullable;
import android.view.LayoutInflater;
import android.view.View;
import android.view.ViewGroup;

/** * Created by admin on 04-05-2017. */
public class First_Fragment extends Fragment {
    @Nullable    @Override    public View onCreateView
(LayoutInflater inflater, @Nullable ViewGroup 
container, Bundle savedInstanceState)
 {
        View v = inflater.inflate(R.layout.fragmet_first, null);
        return v;
    }
}

Second_Fragment.java
package com.college.runtimeaddfragmentdemo;

import android.app.Fragment;
import android.os.Bundle;
import android.support.annotation.Nullable;
import android.view.LayoutInflater;
import android.view.View;
import android.view.ViewGroup;

/** * Created by admin on 04-05-2017. */
public class Second_Fragment extends Fragment {
    @Nullable    @Override    public View onCreateView
(LayoutInflater inflater, @Nullable ViewGroup container,
 Bundle savedInstanceState) 
{
        View v = inflater.inflate(R.layout.fragment_second, null);
        return v;
    }
}
 MainActivity.java

package com.college.runtimeaddfragmentdemo;

import android.app.FragmentManager;
import android.app.FragmentTransaction;
import android.support.v7.app.AppCompatActivity;
import android.os.Bundle;
import android.view.View;
import android.widget.Button;

public class MainActivity extends AppCompatActivity {
    Button first_frag, second_frag;

    @Override    protected void onCreate(Bundle savedInstanceState) {
        super.onCreate(savedInstanceState);
        setContentView(R.layout.activity_main);
        first_frag = (Button) findViewById(R.id.btn_frag1);
        second_frag = (Button) findViewById(R.id.btn_frag_two);

        first_frag.setOnClickListener(new View.OnClickListener() {
            @Override            public void onClick(View v) {
                FragmentManager fragmentManager = getFragmentManager();
                FragmentTransaction fragmentTransaction
                 = fragmentManager.beginTransaction();
                First_Fragment first = new First_Fragment();
                fragmentTransaction.add(R.id.ll_container_first, first, "FIRST");
                fragmentTransaction.commit();

            }
        });
        second_frag.setOnClickListener(new View.OnClickListener() {
            @Override            public void onClick(View v) {
                FragmentManager fragmentManager = getFragmentManager();
                FragmentTransaction fragmentTransaction
                 = fragmentManager.beginTransaction();
                Second_Fragment second = new Second_Fragment();
                fragmentTransaction.add(R.id.ll_container_first, second, "SECOND");
                fragmentTransaction.commit();

            }
        });
    }
}

output
 
Android Fragment

Add Android fragment


How To Read Excel Sheet in Android Using jexcelApi


==>Android Application in jexcelapi through you can easily read excel sheet data and also set the data in Textview  android.

=>If You Want To Read Data To Excelsheet in Android so make Sure Follow Below Steps:-

Step  1:-
Create A new Android Project.

Step  2:- 
paste a bellow code to mainxml file.
 
<?xml version="1.0" encoding="utf-8"?>
<LinearLayout xmlns:android="http://schemas.android.com/apk/res/android" 
 xmlns:tools="http://schemas.android.com/tools" 
 android:id="@+id/container" 
 android:layout_width="match_parent" 
 android:layout_height="match_parent" 
 android:background="#ffffff" 
 android:orientation="vertical">

    <TextView         
android:id="@+id/textView" 
 android:layout_width="wrap_content" 
 android:layout_height="wrap_content" 
 android:text="Scan" 
 android:textColor="#000000" 
 android:textSize="30dp" />

    <Button 
 android:id="@+id/readdata" 
 android:layout_width="250dp" 
 android:layout_height="80dp" 
 android:layout_gravity="center" 
 android:layout_margin="10dp" 
 android:gravity="center"
 android:text="Read Data" 
 android:onClick="Read" 
 android:textSize="18dp" />

</LinearLayout>


 Step  :-3
if you not have a Assets folder then Create a Assets Folder and Paste in that a ExcelSheet.

Step   4:-
Download A jexcelapi jar file in this link to download https://sourceforge.net/projects/jexcelapi/files/
and also paste this jar file is lib direcrtory.

step  5:-
Paste bellow code to main.javafile

package com.college.barcodedemos;

import android.app.Activity;
import android.app.AlertDialog;
import android.content.ActivityNotFoundException;
import android.content.Context;
import android.content.DialogInterface;
import android.content.Intent;
import android.content.res.AssetManager;
import android.net.Uri;
import android.os.Bundle;
import android.view.Menu;
import android.view.MenuItem;
import android.view.View;
import android.widget.Button;
import android.widget.TextView;
import android.widget.Toast;

import java.io.InputStream;

import jxl.Cell;
import jxl.Sheet;
import jxl.Workbook;

public class MainActivity extends Activity {
    Button Read;
    TextView data;


    @Override    protected void onCreate(Bundle savedInstanceState) {
        super.onCreate(savedInstanceState);
        setContentView(R.layout.activity_main);
    }

    public void Read(View v) {
        //Read=(Button)findViewById(R.id.readdata);        try {
            AssetManager am = getAssets();
            InputStream is = am.open("info.xls");
            Workbook wb = Workbook.getWorkbook(is);
            Sheet s = wb.getSheet(0);
            int row = s.getRows();
            int cols = s.getColumns();
            String xx = "";
            for (int i = 0; i < row; i++) {
                for (int c = 0; c < cols; c++) {
                    Cell z = s.getCell(c, i);
                    xx = xx + z.getContents();
                }
                xx = xx + "\n";
            }
            display(xx);

        } catch (Exception e) {

        }

    }

    public void display(String Value) {
        data = (TextView) findViewById(R.id.textView);
        data.setText(Value);
    }
}

Step  6:-

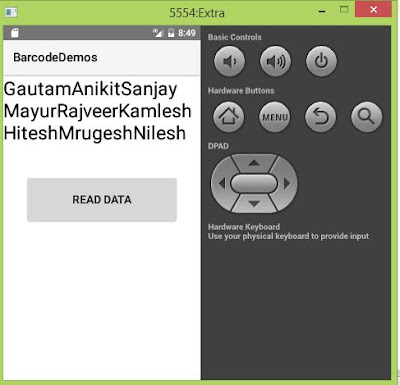
Test The Output
 
Before Click Button  project  output is:-
 
android Read Excel data and set textview
 

 After Clicked Read Data Button output Display this output :-


android excel sheed data read